How To Make Moist Banana Bread Every Time
I have thrown away exactly three loaves of banana bread in my life. Not because they burned. Because they were dry. Crumbly, sad, flavorless bricks that even a slather of butter could not save. Each time I stood at the counter, staring at the wreckage, convinced I had followed the recipe perfectly. But I had not. I had missed the signals.
Most banana bread recipes are lying to you. Not on purpose. They just skip the parts that actually matter. They say “do not overmix” without showing you what overmixed batter looks like. They say “ripe bananas” without explaining that a yellow banana with a few spots is not ripe enough. They tell you to use a toothpick to check doneness, which is the single fastest way to ruin a perfectly good loaf.
Here is what I learned after dozens of test loaves, a lot of reading, and those three painful trips to the trash can. Moist banana bread is not about luck or secret family recipes. It is about understanding four things: how much flour you actually put in, which fats coat the flour proteins, how long you mix, and when you pull it from the oven. Get those four things right, and you can riff on the recipe however you want.
The Banana Ripeness Rule Nobody Explains Well
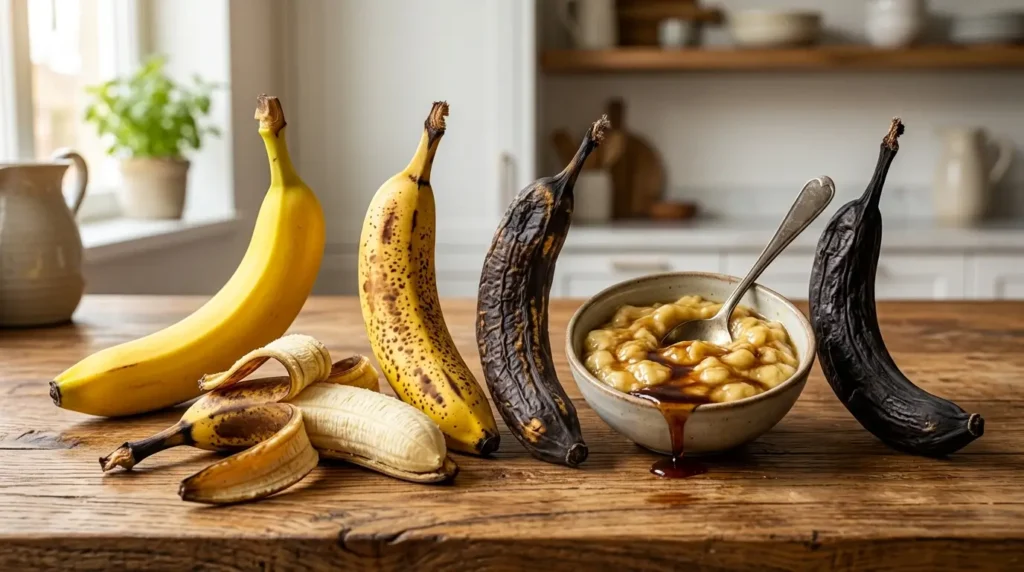
Bananas are the moisture engine of this bread. But a banana that is merely yellow with brown spots has not converted enough starch to sugar yet. You want bananas that look alarming. The peel should be at least half black. Deep brown, almost translucent in places. The flesh inside will be soft and intensely sweet.
This matters because sugar is hygroscopic. It grabs onto water molecules and holds them. A fully ripe banana with high sugar content will lock moisture into the crumb during baking. A firm, lightly spotted banana has less sugar, so that water escapes as steam, and you get a drier loaf.
If your bananas are not ready, you have two choices. Wait three more days. Or use frozen bananas. Freezing ruptures the cell walls inside the fruit. When you thaw them in a bowl, they release a pool of syrupy liquid. Do not drain this. Pour all of it, liquid and pulp, into your batter. It is concentrated banana flavor and pure moisture. I actually prefer frozen bananas now. They are more reliable.
Test Kitchen Note: I once raced two batches side by side. One with barely spotted bananas. One with black, frozen-thawed bananas. The spotted-banana loaf was edible but dry by day two. The frozen-banana loaf stayed moist for four full days. Same recipe. Same oven. The banana itself made the difference.
Weigh Your Flour or Live With the Consequences
This is the hill I will die on.
A cup of all-purpose flour should weigh 125 grams. But if you scoop your measuring cup directly into the flour bin, you can pack in 150 to 160 grams without realizing it. That is a 20 to 28 percent increase. You just added an extra quarter-cup of flour. Your loaf is doomed before it hits the oven.
Flour is the structural backbone of banana bread. Too much flour means too much gluten-forming protein. Gluten is necessary; it gives the bread its frame. But excess gluten creates a tight, tough network that squeezes out moisture and makes the crumb feel dry even if there is technically water present.
Buy a digital kitchen scale. They cost $12 to $15. Put your mixing bowl on it. Tare it. Add 125 grams of flour per cup the recipe calls for. If the recipe is measured in cups and you refuse to buy a scale, at least use the spoon-and-level method. Spoon flour into the measuring cup, then sweep a knife across the top. Never scoop.
Here is a quick weight reference table for the standard loaf recipe.
| Ingredient | Weight for 1 Cup |
|---|---|
| All-purpose flour | 125 grams |
| Granulated sugar | 200 grams |
| Brown sugar (packed) | 220 grams |
| Mashed banana | 225 grams (approx.) |
If you only change one thing after reading this, buy the scale. It fixes more banana bread problems than any other single tool.
Also Read: Easy Homemade Cookies Without Chilling Dough 2026
Butter Gives Flavor. Oil Gives Moisture. Use Both.
Butter tastes incredible. The way it browns and carries vanilla and caramel notes is irreplaceable. But butter is roughly 20 percent water. That water combines with flour and activates gluten. Plus, when the loaf bakes, that water turns to steam and leaves the crumb. Butter alone creates a delicious but slightly drier texture.
Oil is 100 percent fat. Zero water. It coats the flour proteins with a waterproof barrier, preventing gluten from forming in the first place. Oil-based banana bread is softer, stays moist longer, and has a more tender crumb. But the flavor is flatter. It lacks the nuttiness of butter.
The solution is a 50/50 split. Melt half a stick of butter (56 grams). Add an equal weight of neutral vegetable oil, like canola or grapeseed. You get the butter flavor and the oil’s moisture-locking power. This is what bakeries do. They are not choosing one or the other. They are using both.
If you want to go further, brown the butter first. Let it cook until the milk solids turn golden and smell nutty. Then whisk in the oil. This adds a deep, almost caramelized layer of flavor that plain melted butter cannot touch. It takes four extra minutes and is worth every second.
The 15-Minute Maceration Step
This is a technique borrowed from pie-making, and it is completely absent from most banana bread recipes online.
Before you mix anything else, mash your bananas in a bowl and stir in both your granulated and brown sugar. Then walk away for 15 minutes. Let it sit.
Sugar pulls water out of the bananas through osmosis. The mixture transforms from a chunky mash into a glossy, thin syrup with small fruit pieces suspended in it. This syrup disperses through the batter far more evenly than plain mashed banana would. Every bite gets moisture and flavor, not just the pockets where banana chunks happened to land.
This also means you can use less mixing when you combine wet and dry ingredients later. The banana is already fully integrated into the wet mixture. Fewer folds. Less gluten. More tenderness. It is a small step with an outsized effect.
The Sour Cream Decision
Acid tenderizes gluten. It interrupts the protein bonds that make dough tough and elastic. This is why buttermilk biscuits and sour cream coffee cakes have such soft textures. Banana bread benefits from the same chemistry.
You have three good options, in order of my preference:
-
Full-fat sour cream. Thick, rich, and adds a slight tang that balances the sweetness.
-
Plain Greek yogurt. Higher protein, slightly less fat, but still acidic and effective. The best option if sour cream is not in your fridge.
-
Buttermilk. Works beautifully but is thinner. If you use it, reduce any other liquid in the recipe slightly, or your batter may be too loose and the add-ins will sink.
Use 1/2 cup of whichever you choose. If you live somewhere buttermilk is hard to find, like parts of Southeast Asia or rural areas, yogurt is your most reliable option. It is available almost everywhere. Coconut milk yogurt even works for a dairy-free version, though the crumb will be slightly less rich.
The Mixing Method That Actually Matters
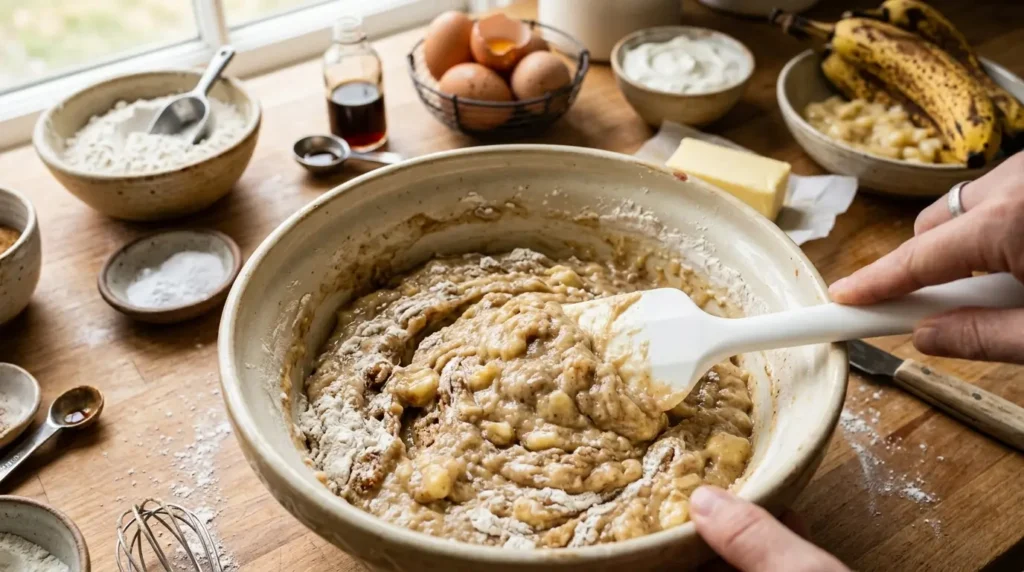
Banana bread uses the muffin method, not the creaming method. This is a quick bread, not a cake. You are not beating air into butter and sugar. You are combining wet ingredients, combining dry ingredients, and then barely bringing them together.
Here is the sequence:
-
Whisk all wet ingredients in one bowl. Mashed macerated bananas, eggs, oil, melted butter, sour cream, vanilla.
-
Whisk all dry ingredients in a second bowl. Flour, baking soda, salt.
-
Pour the wet into the dry.
-
Fold with a silicone spatula. Cut down through the center, scrape along the bottom, and fold over the top. Rotate the bowl.
-
Count your strokes. Stop between 10 and 12 folds.
At 10 to 12 folds, the batter will still look wrong. There will be visible white streaks of flour. Small lumps. It looks unfinished. That is the point. Those streaks will hydrate during baking. Those lumps are pockets of tenderness. A smooth, uniform batter means you overmixed. Overmixed batter means activated gluten. Activated gluten means a tough, rubbery loaf that tastes dry even when it is not.
This is the moment where I used to panic and give it three more stirs. Do not do it. Trust the unfinished look. It works.
Baking and the Toothpick Lie
Most recipes tell you to bake until a toothpick inserted in the center comes out clean. This is wrong. A clean toothpick means the internal temperature has climbed high enough to evaporate all free water from the center of the loaf. By the time that happens, the outer portions are overbaked.
The correct test is to insert a thin skewer or knife into the crack at the top center of the loaf. You want it to come out with moist crumbs clinging to it. Not wet batter. Moist, tender crumbs. If you have an instant-read thermometer, the internal temperature should read between 200 and 205 degrees Fahrenheit, or roughly 93 to 96 degrees Celsius.
The loaf will continue cooking after you pull it from the oven. This is carryover cooking. The residual heat in the pan and the loaf itself keeps baking the center for another 5 to 7 minutes. If you waited for a clean toothpick, you added that carryover time on top of an already overbaked loaf.
Bake at 350 degrees Fahrenheit (177 degrees Celsius). If you are using a glass loaf pan, lower the temperature to 325 degrees Fahrenheit (163 degrees Celsius). Glass is an insulator. It heats slowly and holds heat longer. The lower temperature prevents the crust from scorching before the center sets.
| Pan Material | Oven Temperature | Notes |
|---|---|---|
| Light aluminum | 350°F (177°C) | Best all-around choice. Even heat. |
| Dark metal | 325°F (163°C) | Absorbs heat faster. Reduce temp to avoid thick crust. |
| Glass | 325°F (163°C) | Insulates. Extend bake time by 5-10 minutes. |
The Cool-Down Window
When the loaf comes out of the oven, leave it in the pan on a cooling rack for exactly 10 minutes. Not 5. Not 20. Ten.
During those 10 minutes, steam inside the loaf redistributes moisture through the crumb. The crust softens slightly. The structure stabilizes enough to handle without collapsing. If you try to remove it too early, the loaf will crack or tear. If you leave it in the pan too long, the bottom steams against the metal and turns gummy.
After 10 minutes, lift the loaf out using a parchment paper sling. You did line the pan with parchment, right? Grease the exposed metal ends and lay a parchment strip across the width with overhang on both sides. This makes removal effortless and prevents the sticky, caramelized banana sugars from gluing your loaf to the pan.
Let the loaf cool completely on the rack before slicing. This takes about an hour. I know it is hard. The smell fills the house and you want a warm slice. But cutting into hot banana bread smashes the crumb, releases steam that should have stayed inside, and leaves you with a torn, gummy interior. Patience here is a moisture-retention strategy.
Storage That Keeps It Moist for Days
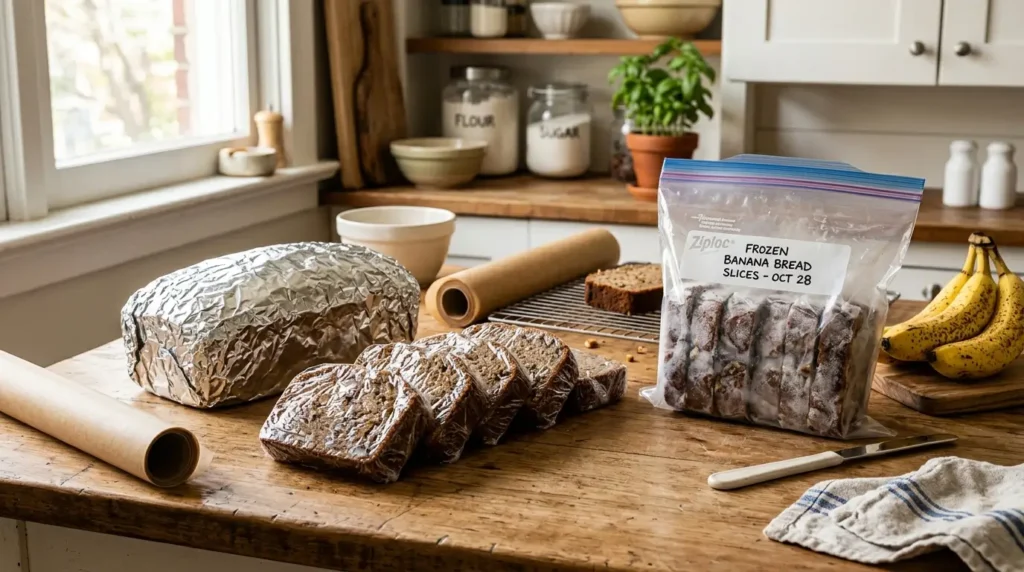
Wrap the completely cooled loaf tightly in plastic wrap, then a layer of aluminum foil. Store it at room temperature. It stays moist for 4 days.
Never refrigerate banana bread. Refrigerator air is cold and dry. It accelerates starch retrogradation, the process where starch molecules realign and expel water. This is the scientific reason bread goes stale faster in the fridge than on the counter. It seems wrong. It is true.
For longer storage, slice the loaf, wrap individual slices in plastic, and freeze them in a zip-top bag. A frozen slice thaws on the counter in about 30 minutes or in a toaster oven in 5. This is how I keep banana bread around for weeks without losing texture.
Common Failures and Their Fixes
| Problem | Likely Cause | Fix |
|---|---|---|
| Dry, crumbly loaf | Too much flour; overbaked | Weigh flour; pull at 200-205°F |
| Gummy, dense center | Overmixed batter; oven too cool | 10-12 folds only; check oven temp with thermometer |
| Sunken middle | Oven door opened too early; too much leavening | Do not open door before 40 minutes |
| Soggy bottom | Left in pan too long after baking | Remove after 10 minutes exactly |
| Add-ins all sank | Batter too thin; fruit not coated in flour | Toss add-ins in 1 tbsp flour before folding |
Substitutions That Work
You can adapt this loaf for dietary needs without wrecking the texture. Here is what I have tested and what I would skip.
Dairy-free: Use full-fat coconut milk yogurt instead of sour cream. Use all oil instead of the butter-oil mix. The flavor shifts toward tropical, which honestly works with banana.
Egg-free: One flax egg (1 tablespoon ground flaxseed plus 3 tablespoons water, rested 5 minutes) replaces one egg. The crumb will be slightly more crumbly. Add an extra tablespoon of oil to compensate.
Gluten-free: Use a 1:1 gluten-free flour blend that contains xanthan gum. King Arthur Measure for Measure is the most consistent in my testing. The loaf will be slightly denser but still moist if you nail the banana ripeness.
Reduced sugar: You can cut the sugar by up to 25 percent. Beyond that, you lose moisture retention and browning. The loaf will be paler and stales faster.
Self-rising flour: Common in the UK and Australia. If using it, omit the baking soda and salt. The flour already contains leavening and salt. The texture will be slightly more cake-like.
Frequently Asked Questions
What makes banana bread more moist, oil or butter?
Oil. Oil is pure fat with no water. It coats flour proteins and blocks gluten formation more effectively than butter, which contains about 20 percent water. A 50/50 mix gives you the best of both.
Why is my banana bread dry even with very ripe bananas?
Almost certainly too much flour. Even perfect bananas cannot save a loaf with 20 percent extra flour. Weigh your flour. Also check your oven temperature with a separate thermometer. Ovens lie.
Can I add an extra egg to make it more moist?
Not exactly. An extra whole egg adds more protein structure, which can make the loaf springy and slightly drier. Adding just an extra egg yolk, however, increases fat and emulsifying power. That does help with tenderness and moisture perception.
How do you tell when banana bread is done without a toothpick?
Use an instant-read thermometer. Look for 200 to 205 degrees Fahrenheit at the center. Or insert a thin knife and check for moist crumbs, not clean metal.
Does banana bread need to be refrigerated?
No. Refrigeration accelerates staling. Keep it wrapped at room temperature for up to 4 days. Freeze any portion you will not eat in that window.
Why does my banana bread crack so much on top?
A large central crack is normal and actually a good sign. It means the leavening was strong and the crust split to allow the loaf to expand. A perfectly smooth top often means the batter was undermixed or the oven was too cool.
How many bananas do I actually need?
Three medium bananas yield about 1 and 1/2 cups mashed, or roughly 340 grams. This is the standard amount for one 9×5-inch loaf. If your bananas are small, use four. Weigh them if you want consistency.
Can I make this into muffins?
Yes. Fill muffin cups about three-quarters full. Bake at 375 degrees Fahrenheit (190 degrees Celsius) for 18 to 22 minutes. The same moist crumb test applies. Start checking at 18 minutes.
What is the secret ingredient bakeries use?
There is no single secret ingredient. Bakeries use a combination of practices: oil in the fat mix, precise flour measurement by weight, acidic dairy like sour cream, and pulling loaves at the right internal temperature. It is process, not magic.
Why did my loaf sink in the middle?
You opened the oven door too early, the oven temperature spiked or dropped, or your baking soda was expired. Check your oven thermometer and use fresh leavening. Do not open the door during the first 40 minutes of baking.
A Straightforward End
I stopped ruining banana bread when I stopped trusting recipe instructions that were vague. “Mix until combined” does not help. “Bake until done” is useless. The difference between a dry loaf and a moist one lives in the specifics: the weight of your flour, the color of your bananas, the number of times you fold the batter, and the temperature at which you pull the pan.
Get a scale. Wait for black bananas. Use oil and butter together. Fold 12 times and stop. Pull the loaf at 200 degrees. Let it cool before you cut it.
That is the whole system. It works every time.
Leave a Reply